Sorry, what was I talking about? Shakers! Probably you already know, in general, what a shaker is and is good for. In short: it's a container for thoroughly mixing ingredients (usually for a cocktail) together quickly and thoroughly. Usually this is done with ice in the shaker as well, in order to rapidly chill the ingredients while you mix them, the biggest exception that I know of being the ridiculously named "dry shake" which is shaking vigorously without ice to aerate egg whites in a fizz.
That said, there are several different varieties of shaker, and I recently acquired a number of them to experiment and review. So, here we go!
The Cobbler Shaker
aka: "Manhattan Shaker", "Shaker", "Cocktail Shaker", "Come apart you %&*@ thing!"

Description: The Cobbler shaker is the shaker that most people think of when they thing "shaker". It's a three piece unit made up of a shaker tin for the bottom (this is where you pour all your ingredients and the ice), a short, squat lid that tapers to a spout with built-in strainer, and finally a small cap for the spout that doubles as a jigger.
Usage: The cobbler is largely shunned by professional bart
 enders, with the exception of the Japanese bar scene (and those who learned there) where it is widely used. Or so I am told by the internet. In fact, this scene has (in true Japanese style) invented a particular method of shaking which is used with the Cobbler, called "The Hard Shake". See the video below, apparently the idea is that the liquid hits four points in the shaker each cycle, rather than the typical two:
Pros: Firstly, these things are trivially easy to obtain. You can pick up a decent cobbler shaker at most home goods and even grocery stores. They come in a wide variety of sizes from a tiny 8 oz. to a gigantic 60 oz. (the "normal" size is 24 ounces). No matter what size you have, you can fill almost "to the line" since the top fits over the tin, which allows you to make a lot of drinks in a single shaker-full. There's no need for a seperate strainer, since there is one built in, and you can use the cap to measure portions, so you can avoid a tool for that too if you're the type you doesn't like more stuff. :) You can find a lot of variations on the basic theme too, if you start looking. For instance:
- Different styling
- Different material: plastic shakers, thicker-walled metal shakers, even glass-bodied shakers.
- Ice crushing attachment
- Pitcher handle
- Shelved overlap between the top and the body to help avoid binding.
- Built in drink recipe references
Overall: Convenient, often cheap, and serviceable. There's a reason that every home bar in the world has one of these. However, if you're going to do a lot of shaking, I'd either look for a different shaker or find a high quality cobbler that is: A) Metal B) Thick-walled and C) Shelf-style. That'll work a lot better, but it will also cancel out the "cheap" and "convenient".
Boston Shaker
Description: If you've been to a bar and ordered a cocktail, odds are you've se
 en a Boston Shaker used. This is far and away the most common and popular shaker style used by professional bartenders. A two-part unit, it consists of a shaker tin on the bottom and a standard pint glass on top.
Usage: Put your ingredients in the tin with ice, and cap with the pint glass. Make sure to leave enough room in the tin to fit your glass! First timers will try to put the glass on straight-vertical, but you actually want it canted to one side. This makes a better seal, and because the shaking motion is curved, it actually makes the shaking more natural. When you seal it, you'll need to "pop" the glass by giving it a firm tap, otherwise you probably won't get a drink-proof seal. Shake so that the curve of the motion is matched by the curve in the shaker created by the cant of the glass. I've seen lots of techniques for unsealing the glass. The most common is a sharp percussion to the side of the glass. I've found it effective to push the glass further in the direction it is canted (it seems counter-intuitive, but it's easier than the opposite motion).
Pros: It's a ridiculously simple device. Hell, odds are good that if you have a cobbler shaker, you already have a Boston shaker since you can use the bottom of the cobbler as your tin and you probably own a pint glass or twenty. Even if you're buying a tin for this purpose, a good quality tin is only a few bucks. The combined height means that each stroke of shaking is moves the liquid much more than a cobbler, and once you get the hang of sealing it, you can shake one-handed pretty easily. If your drink happens to be served in a pint glass, you've also pre-chilled your serving glass. Handy!
Cons: You'll either need to get a Hawthorne strainer or spend some time learning to hold the two pieces slightly separated to strain your drink. The pint glass is heavy, which makes the balance of the whole thing feel oddly top-heavy. Getting and breaking the seal takes some practice.
Overall: You can probably start using this shaker today without spending any of your hard earned booze money, and you'll get the added advantage of looking like you know what you're doing! All that AND you'll never have to struggle to pry your cobbler apart again. It's a win-win! A word of advice though: practice for a while before you try to do this in public. A flying pint glass is a messy and potentially painful mistake to make.
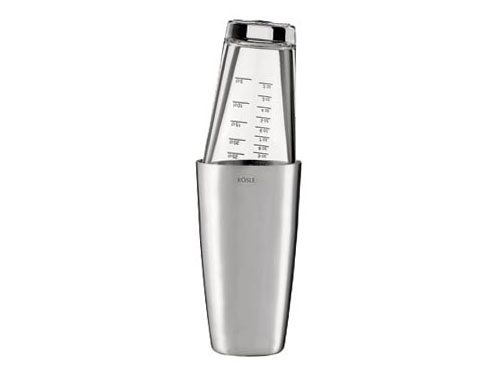
Parisian Shaker
aka: "the French Shaker"
Description: A metal, two-piece unit. It looks kinda like a cobbler, but the top is a
 ll one piece and it doesn't narrow to a spout. The two parts nest together with the top fitting inside the bottom and overlapping by a good inch and a half or so. It's a damn good looking unit too. This is maybe the rarest of the shaker styles, though I hear that some trendy joints are starting to use them.
Usage: You know the drill: fill the bottom, stick the top on, shake vigorously. The trick with the Parisian is that you need to make sure to only add liquid up to the line that the top will overlap. Once you've used it a few times, there will
 be a faint natural line caused by varying wear to guide you, but the first couple times it'll be hit-or-miss.
Pros: It's so pretty! Seriously though, there are some advantages. First of all, the wide overlap makes a seal trivially easy to get, and simple to separate. Despite the similar look, you'll not have the problem with binding that you get with the Cobbler because the top tapers. It's maybe the easiest one-handed shake of all the shakers, the counter just begs for it.
Cons: The biggest con is capacity. Because the top overlaps the bottom so much, there's a hard limit on volume, and it's fairly small. Plenty of space to make a cocktail, but if you're mixing up a round of drinks, you're out of luck. Secondly, once you've made and poured a drink, you need to be careful because the liquid on the overlapping portion of the bottom can cause the top to "float", resulting in losing your seal. This also seems to happen if you push the top on too fast. It feels like a good seal but the air pressure pushes back and you lose the seal. I've found it works best if you next the two pieces fairly slowly, and make sure you maintain pressure while you shake (a finger is fine, so one-handed operation is unimpaired), especially after it's wet. Oh, and you'll definitely want a Hawthorne strainer, because the separation method of straining is awkward at best with the Parisian. Price may be a con too, since so far as I can tell there are only two: one for $10-$15 and the WMF for $60 (this writeup is based on the cheap one).
Overall: For a single cocktail, I love it. But you need to know what you're getting into. Practice first, and if you need to make more than one, use another style.
New York Shaker
aka: "two tins"
Description: This is essentially a Boston Shaker that replaces the pint glass with a smaller tin. My setup uses (on the advice of a blog that I'd link to if I could find it again)
 a weighted 28 oz. tin for the bottom and an unweighted 18 oz. for the top. It's... shiny!
Usage: Just like the Boston :)
Pros: If you know how to use a Boston, you know how to use this shaker. The advantages over the Boston are fairly marginal, but I like them: no chance of broken pint glasses, and a better balance in your hand. Because the of the shift in weight, I find this much more natural feeling than the boston shaker, and I'm much more confident one-handing it since it doesn't feel like the top is going to go flying just from the weight of it. It seals a little easier because it doesn't have the rounded glass edge, and it unseals easier because both the bottom and top tins can flex a bit. You can also customize the size and balance completely, just by swapping out the bottom and top tins (just make sure they'll seal okay when you nest them). Note that when you're buying tins, weighted tins have a thicker double-walled bottom that makes them slightly heavier. Finally, it's pretty cheap: my setup cost just $4 - $5 (plus shipping, I suppose).
Cons: You need to special order this setup from one of the various barware suppliers, and you might want to order multiples of each part because even good quality tins start to take a beating. The edges of the top tin will start to get dinged up, and you won't be able to get a seal anymore as a result. Also the usual warning about needing a Hawthorne or some practice filtering by separation (the technique is, predictably, identical to the Boston).
Overall: After trying all of these, this one has been my favorite, and has rapidly become my go-to shaker. I find that it's the best blend of features and doesn't have any glaring weaknesses.